Many homes in Hawthorne face noise challenges due to busy streets and close neighborhoods. Effective insulation plays a key role in reducing unwanted sound while also improving temperature control and energy efficiency. Using the right insulation materials and installation methods can cut noise by up to 70%, making homes quieter and more comfortable.
Soundproofing solutions like specialized insulation, acoustic window inserts, and mass loaded vinyl help block outside noise without major renovations. Local experts in Hawthorne understand the unique needs of the area and provide tailored services to address both noise and energy concerns.
Choosing professional insulation services ensures materials are installed correctly for the best results. This approach not only lowers noise levels but also helps reduce energy bills, creating a better living environment for Hawthorne residents.
Insulation and Noise Control Solutions for Hawthorne Residences

Noise pollution in Hawthorne is a common concern due to traffic and urban activity. Proper insulation and soundproofing help reduce noise infiltration, improve comfort, and raise overall quality of life inside homes. Effective solutions use the right materials and installation techniques tailored to specific living spaces.
Understanding Noise Infiltration and Sound Transmission
Noise infiltration happens when unwanted sounds enter a home through walls, ceilings, doors, and windows. Sound transmission is how noise moves between rooms or from outside to inside. Both happen because of gaps and poor insulation.
Airborne noise like voices or traffic passes easily through thin walls. Impact noise such as footsteps or furniture moving travels through floors and ceilings.
Blocking noise requires identifying weak points and sealing gaps. Materials like fiberglass insulation absorb sound waves. Adding barriers or layers with different densities stops noise from passing through structures.
Selecting Effective Insulation Materials
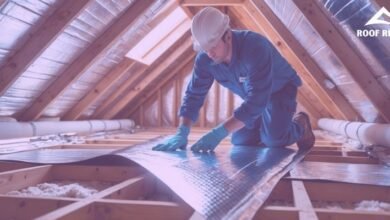
Fiberglass insulation is common in Hawthorne for its sound-absorbing and thermal properties. It fits inside walls and ceilings and reduces sound transmission but may need to be combined with other products.
Acoustic insulation materials like mineral wool offer better density and absorption. Foam panels and spray foam also help seal cracks where noise leaks.
Other useful items include:
- Resilient channels to separate drywall from studs
- Acoustic ceiling panels to reduce sound in upper floors
- Noise barriers like mass-loaded vinyl for tough noise problems
Choosing the right materials depends on the noise type and the room function.
Modern Soundproofing Techniques for Bedrooms and Living Spaces
For bedrooms and living rooms, reducing noise is key for rest and relaxation. Adding resilient channels between drywall and framing lowers sound transmission by creating a break in vibration paths.
Multi-layer drywall combined with acoustic insulation creates dense walls to reduce noise better than one layer alone. Sealing gaps around doors and windows with soundproof seals blocks outside noise.
Using acoustic ceiling panels helps decrease noise coming from floors above. These panels absorb impact noise and improve sound quality inside the room.
Installing noise barriers behind walls or under floors adds extra layers that block external sounds from passing through living spaces.
Enhancing Comfort and Quality of Life Through Noise Reduction
Reducing noise inside homes in Hawthorne improves sleep quality, lowers stress, and increases privacy. Good sound insulation creates a peaceful environment to relax and work.
Effective noise control also raises property value by making homes more comfortable. Quiet spaces help families focus, study, and enjoy time together.
By combining proper insulation materials, sealing methods, and soundproofing techniques, residences can cut down noise infiltration significantly. This leads to better comfort, quieter bedrooms, and overall improved quality of life.
Improving Energy Efficiency and Reducing Noise in Hawthorne Neighborhoods

Proper insulation plays a key role in lowering energy bills and controlling noise in homes. Addressing both exterior and interior walls helps strengthen comfort inside buildings. Balancing noise control efforts with energy-saving measures ensures better overall results for residents.
Insulating Exterior and Interior Walls
Insulating exterior walls stops heat from escaping during cold months and keeps homes cooler in summer. Materials like spray foam or fiberglass work well to improve energy efficiency by sealing gaps and reducing drafts. This leads to lower utility bills for homeowners.
Interior walls also matter for noise control. Adding insulation inside walls between rooms cuts down sound travel. High-density insulation materials offer good noise blocking without affecting space or energy efficiency. For Hawthorne homes near busy streets, this can reduce outdoor noise significantly while keeping rooms warm or cool.
Balancing Noise Control With Lower Energy Bills
Effective noise control does not have to raise energy costs. Using insulation that both blocks sound and insulates against temperature changes helps maintain balance. For example, installing thick, soundproof insulation in walls or ceilings doubles as thermal protection.
Upgrading doors and windows with solid core or insulated versions further limits noise entry and heat loss. This keeps homes quieter and reduces the need for heating or cooling. Homeowners should choose materials that meet both soundproofing and energy-saving needs to achieve comfort without raising bills.
- Armour Hawthorne Insulation
- 3355 W El Segundo Blvd, Hawthorne, CA 90250, United States
- +14244874483
- armourhawthorneinsulation.com
Frequently Asked Questions
Insulation and noise control in Hawthorne focus on effective materials, proper installation, and compliance with local rules. Residents consider ways to reduce heat loss, improve soundproofing, and understand inspections and incentives.
What are the recommended materials for soundproofing homes in Hawthorne?
Materials like mineral wool, fiberglass, and dense foam are commonly used for soundproofing. These help block and absorb sound waves to lower noise levels inside homes.
How can Hawthorne residents effectively insulate their homes against heat loss?
Using proper insulation in walls, attics, and floors can prevent heat loss. Sealing gaps and adding weatherstripping around windows and doors also helps keep homes warm and energy-efficient.
Are there any local incentives for improving home insulation in the Hawthorne area?
Local governments sometimes offer rebates or tax credits for upgrading insulation. Residents should check with Hawthorne’s city offices or energy programs for current incentives.
What are the best practices for installing insulation to ensure maximum noise reduction?
Insulation should be installed tightly without gaps to block sound effectively. Combining insulation with soundproofing materials and vibration control systems improves noise reduction.
How do Hawthorne’s building codes affect insulation and noise control measures?
Hawthorne follows New Jersey’s Noise Control Act, limiting noise to 65 decibels during the day and 50 at night. Building codes require insulation that helps meet these noise standards.
Can residents request an inspection for inadequate insulation and noise control?
Yes, residents can contact local code enforcement to report issues. Inspections help ensure homes meet noise control and insulation standards set by the city.