Metal roofing has become a popular choice for homeowners looking for durability and energy efficiency. With a lifespan of 50-70 years, metal roofs offer long-term protection while reducing cooling costs by reflecting heat away from your home. Installing a metal roof yourself can save money and be completed in just a few days with the right preparation and tools.
Before starting your metal roofing project, you’ll need to measure your roof’s square footage and the length from ridge to eave. This ensures you purchase the correct amount of materials. For existing homes, check local building codes to determine if you can install metal roofing over existing shingles or if you need to strip the old roofing material first.
The installation process involves covering the roof with roofing felt and a breathable membrane before securing the metal panels. While the upfront cost of materials may be higher than traditional asphalt shingles, the energy savings and minimal maintenance make metal roofing a cost-effective choice in the long run.
Key Takeaways
- Metal roofing is durable, lasting 50-70 years while reflecting heat to improve energy efficiency in your home.
- Proper measurement and preparation of the roof surface are essential steps before installing metal panels.
- Metal roofs may cost more upfront but offer long-term value through energy savings, recyclability, and minimal maintenance requirements.
Choosing the Right Metal Roofing Materials

Selecting appropriate materials is crucial for a successful metal roof installation. The right choices will ensure durability, weather resistance, and visual appeal while matching your budget constraints.
Types of Metal Roofing
Steel roofing is the most common choice due to its strength and affordability. It typically comes galvanized or coated with zinc to prevent rust. Steel panels cost between $5-$12 per square foot and last 40-70 years.
Aluminum roofing offers excellent corrosion resistance, making it ideal for coastal areas. It’s lightweight but durable, typically lasting 50+ years. Expect to pay $7-$15 per square foot for aluminum options.
Copper and zinc roofing provide premium options with distinctive patinas that develop over time. These materials can last 100+ years but come at higher price points of $15-$30 per square foot.
Metal roofing comes in various styles:
- Standing seam panels: Clean, modern appearance with concealed fasteners
- Corrugated metal panels: Traditional wavy pattern, economical choice
- Metal shingles: Mimic the look of traditional shingles
- Modular panels: Larger sections for faster installation
Essential Tools and Supplies
Proper tools ensure safe and efficient metal roof installation. Safety equipment should be your top priority.
Safety Equipment:
- Ladder or scaffolding with secure footing
- Safety harness when working on steep pitches
- Cut-resistant gloves
- Safety glasses
- Non-slip footwear
Cutting and Measuring Tools:
- Circular saw with metal-cutting blade
- Tin snips for detailed cuts
- Chalk line for straight guidelines
- Tape measure
Fastening Tools:
- Drill with magnetic bit holder
- Impact driver for roofing screws
- Hammer for roofing nails in appropriate areas
Most metal roofing systems require specific fasteners. Use roofing screws with neoprene washers that match your roofing material to prevent galvanic corrosion.
Selecting Roofing Accessories
Proper accessories ensure your metal roof performs optimally and remains watertight for decades. Quality accessories often determine how well your roof handles extreme weather.
Essential Flashing Components:
- Drip edge for roof perimeters
- Ridge cap for roof peaks
- Gabled trim for roof edges
- Sidewall flashing where roof meets walls
- Valley flashing for roof intersections
Closure strips fill gaps between panels and prevent water infiltration. These foam pieces come shaped to match specific panel profiles.
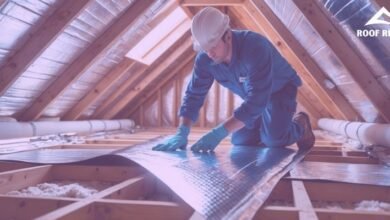
Underlayment serves as a secondary moisture barrier. Synthetic underlayments offer better durability than traditional felt. In snow-prone regions, consider ice and water shield at eaves and valleys.
Sealants like butyl tape and high-quality caulk prevent leaks at joints and penetrations. Choose products specifically designed for metal roofing to ensure proper adhesion and longevity.
Preparing the Roof Surface

Proper preparation of your roof surface is crucial for a successful metal roofing installation. The quality of your preparation work directly affects how well your new metal roof performs and how long it lasts.
Removing Old Roofing and Inspecting Roof Decking
Start by removing all old roofing materials down to the decking. Use a roofing shovel or pry bar to lift old shingles, and a hammer to remove nails. Work in small sections, starting from the top and moving downward.
Once exposed, thoroughly inspect the roof decking for damage. Look for soft spots, rot, or water damage that might indicate structural issues. Replace any damaged plywood or boards before proceeding.
Check local building codes regarding roof layers. Some jurisdictions allow metal roofing over one layer of existing shingles, but direct-to-deck installation provides the best results.
Clean the entire roof surface of debris, loose nails, and dirt. A clean, stable base is essential for proper installation.
Installing Underlayment and Water Shields
Apply ice and water shield along eaves, valleys, and around penetrations. This self-adhering membrane creates a watertight seal in vulnerable areas prone to water intrusion or ice dams.
Roll out synthetic underlayment across the entire roof, starting at the bottom edge. Overlap horizontal seams by 4 inches and vertical seams by 6 inches.
Secure the underlayment with cap nails every 8-12 inches along seams and 18 inches in the field. Avoid over-driving nails which can tear the material.
For low-slope sections (less than 3:12 pitch), consider using a double layer of underlayment or a specialized moisture barrier designed for metal roofing.
Marking Reference Lines for Accurate Installation
Snap horizontal chalk lines across the roof as installation guides. Start at the eave and mark lines at intervals matching your panel width.
Create a square reference line at the gable edge using the 3-4-5 triangle method. Measure 3 feet along the eave, 4 feet up the gable, and confirm the diagonal measures 5 feet for a perfect right angle.
Mark panel overlap locations if using exposed fastener panels. For standing seam systems, mark where each panel seam will align.
Identify and mark locations of roof penetrations like vents and chimneys. Precise measurements here will save time during panel installation.
Pre-plan fastener locations by marking stud or rafter positions on the fascia board. This ensures you’ll hit solid structural support when securing panels.
Step-by-Step Metal Roofing Installation Process
Installing a metal roof requires careful planning and execution. The following steps will guide you through the installation process from laying panels to adding the finishing touches.
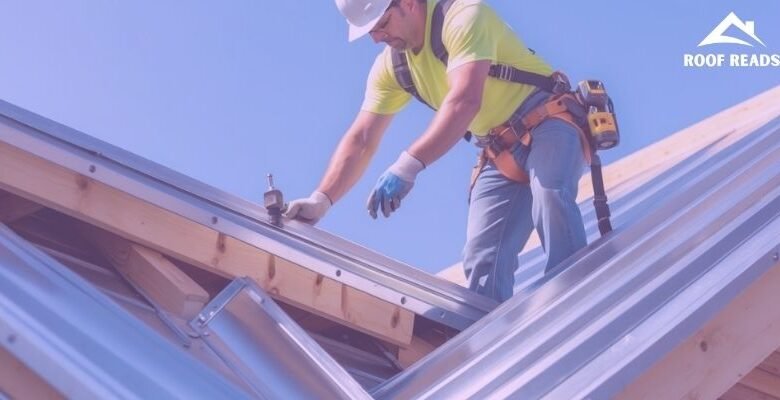
Laying and Fastening Metal Panels
Begin by measuring and cutting your metal panels to the correct length. Allow for a 2-3 inch overhang at the eaves for proper water runoff.
Place the first panel at the edge of the roof, making sure it’s square with the eave line. Secure it with roofing screws at the recommended spacing—typically every 24 inches along the purlins.
For exposed fastener systems, place screws in the flat section of the panel, not on the ridges. Use rubber or neoprene washers with screws to prevent leaks.
When installing subsequent panels, overlap them according to manufacturer specifications (usually 1-2 inches). Apply butyl tape or sealant between overlaps to ensure a watertight seal.
Work your way across the roof, checking alignment frequently. Avoid over-tightening screws as this can damage the metal or create dimples that collect water.
Installing Flashing and Trim Components
Start with the drip edge or eave trim along the bottom edge of the roof. Secure it with roofing screws every 12-24 inches.
Install sidewall flashing where the roof meets vertical walls. Overlap pieces by at least 3 inches and seal joints with sealant.
For valleys where two roof sections meet, install valley flashing before laying panels. This prevents water from seeping under the metal panels.
At gabled edges, install gabled trim after the panels are in place. This covers the panel edges and provides a finished look.
Apply butyl tape beneath all trim components to create a watertight seal. Use matching screws that won’t cause galvanic corrosion when connecting different metal types.
Flashing around chimneys and vents requires special attention. Cut metal panels to fit around these obstacles and install appropriate flashing to prevent leaks.
Finishing with Ridge Caps and Closure Strips
After all panels are in place, install closure strips along the ridge. These foam strips fill the gaps between panel corrugations, preventing water and pest infiltration.
Position ridge caps over the closure strips at the peak of the roof. These caps cover the gap where panels from opposite slopes meet.
Secure ridge caps with roofing screws through the high points of the panels, spacing them every 12-24 inches. Overlap each ridge cap section by 3-4 inches.
For a professional finish, apply sealant at overlapping joints of ridge caps. This adds an extra layer of protection against leaks.
Trim any excess material with metal shears and file down sharp edges for safety. Inspect all fasteners to ensure they’re properly seated with gaskets compressed.
A properly installed ridge cap system not only completes the look of your metal roof but also provides essential protection at one of the most vulnerable areas.
Benefits and Maintenance of Metal Roofs
Metal roofs offer exceptional value through their long lifespan, energy-saving properties, and minimal upkeep requirements. These roofs stand out for their ability to withstand harsh conditions while maintaining their appearance.
Durability and Longevity
Metal roofing systems can last 50-70 years, outlasting traditional asphalt shingles by decades. This impressive lifespan makes them a smart long-term investment for homeowners.
Metal roofs withstand harsh weather conditions including heavy snow, hail, and high winds without damage. They don’t crack, warp, or rot like other roofing materials.
Maintenance requirements are minimal compared to other roofing types. Metal roofs resist moss and algae growth, even in shaded areas. A light rainfall typically washes away debris like leaves and sticks.
Repairs are rarely needed, but when necessary, they’re typically straightforward and less costly than replacing entire sections of traditional roofing.
Energy Efficiency and Savings
Metal roofs reflect solar heat rather than absorbing it, reducing cooling costs significantly. This reflective property can lower summer cooling expenses by 10-25%.
During winter months, metal roofing provides excellent insulation when properly installed, helping maintain consistent indoor temperatures and reducing heating costs.
The energy-efficient properties of metal roofing can lead to substantial savings on energy bills throughout the year. Some homeowners report 20-30% reductions in annual energy costs.
Many metal roofing products qualify for energy efficiency tax credits and rebates, providing additional financial benefits.
Aesthetic and Protective Advantages
Metal roofing comes in various styles, colors, and finishes to complement any architectural design. Options include panels that mimic the look of slate, tile, or wood shakes.
The seamless appearance of many metal roof styles creates a clean, modern look that enhances curb appeal and potentially increases property value.
Metal roofs provide superior protection against water damage, as they create a watertight barrier when properly installed. Their smooth surface allows rain and melting snow to slide off easily.
Fire resistance is another key benefit, with most metal roofing products carrying Class A fire ratings. This can lower home insurance premiums in many cases.
Frequently Asked Questions
Metal roof installation involves specific techniques and considerations that homeowners often have questions about. Here are answers to some common queries that arise during the planning and installation process.
What is the correct way to lay a foundation for metal roofing?
A proper foundation for metal roofing starts with a solid roof deck, typically made of plywood or OSB. This deck must be clean, dry, and free from protruding nails or debris.
Install a synthetic underlayment over the entire roof deck. This provides an additional moisture barrier and helps prevent condensation issues under the metal panels.
For areas with severe weather, consider adding a waterproof membrane at eaves, valleys, and around penetrations for extra protection against water infiltration.
Which steps should be taken for installing metal roofing on a residential house?
First, measure the roof carefully and order materials with a 5-10% overage to account for waste. Remove existing roofing materials if necessary and repair any damaged decking.
Install edge trim along the eaves, followed by the underlayment. Then add rake edge trim at the gables and ridge caps at the peak.
Install the metal panels starting at one edge of the roof, making sure the first panel is square to the eave line. Work across the roof, overlapping panels according to manufacturer specifications.
How can one properly place and secure metal roofing screws?
Use screws specifically designed for metal roofing with neoprene washers to prevent leaks. Place screws in the flat areas of the panel, not in the ribs or seams.
Screws should penetrate the roof deck by at least 3/4 inch. Drive them straight and avoid overtightening, which can compress the washer too much and reduce its effectiveness.
Space screws about 24 inches apart in the field of the panel and 12 inches apart at eaves, ridges, and overlaps. This pattern provides optimal wind resistance.
What are common mistakes to avoid during metal roof installation?
Using incorrect fasteners is a major mistake. Standard screws will cause leaks and premature failure. Always use screws designed specifically for metal roofing.
Failing to allow for expansion and contraction can lead to buckled panels. Leave proper spacing at edges and use sliding clips when required by the manufacturer.
Improper panel alignment causes both aesthetic and functional problems. Take time to ensure the first panel is perfectly square, as this affects the entire installation.
Is it possible to install metal roofing over existing shingles, and if so, how?
Yes, metal roofing can often be installed over one layer of existing shingles. This approach saves removal costs and reduces landfill waste. Check local building codes first, as some areas restrict this practice.
Install furring strips or a slat board system over the shingles to create an air gap and provide a flat mounting surface for the metal panels. This gap improves energy efficiency and prevents moisture issues.
Always add a quality underlayment between the shingles and metal roof. This provides an additional moisture barrier and helps prevent any granules from the old shingles from damaging the new metal roof.
Can metal roofing be installed by a homeowner, and what should be considered before doing so?
Metal roofing installation is within reach of skilled DIYers, but requires careful planning. Homeowners should realistically assess their construction experience, physical abilities, and available time before starting.
Safety considerations are paramount. Proper equipment including fall protection, gloves, and eye protection is essential. Metal edges are extremely sharp and can cause serious injuries.
The complexity of the roof design matters significantly. Simple gable roofs are more DIY-friendly than roofs with multiple valleys, dormers, or complex angles, which might be better left to professionals.